• Hello
  • Notes
  • FAQs
    • My Amazon Shop
    • MY LTK
    • MightyHoop / HoopMaster
    • PhoneSoap
  • KIND WORDS
Menu

THE NURSE NATALIE

  • Hello
  • Notes
  • FAQs
  • SHOP
    • My Amazon Shop
    • MY LTK
    • MightyHoop / HoopMaster
    • PhoneSoap
  • KIND WORDS
72380521-03C5-4492-879C-C8C42339B151 2.JPG

Helpful Tips to Combat Maskne

July 12, 2020

As the world embraces the use of face masks in accordance with local and state guidelines, an irritating side effect has emerged. For many people, this has caused embarrassing and unpleasant blemishes, pimples, and zits—or what dermatologists have affectionately dubbed “maskne.”

Many healthcare professionals and front-line workers are most at risk because their masks are tighter-fitting and they are wearing them for +12 hour shifts. Due to the seal needed from our PPE in order to keep the virus at bay, the occlusion from the mask is causing our pores to clog and blackheads & whiteheads to form.

As a result of the mechanical friction of thick, uncomfortable fabric against our skin coupled with the stress from the pandemic, this is causing an increased moisture-rich environment that’s ideal for bacteria and organisms to proliferate.

A lot of people have noticed that their skin is breaking out even though they may not have suffered from this condition before. This is because mask use combined with poor hygiene can worsen skin issues that already exist and can even cause new ones to form. Add in the summer heat and humidity and you’ve got yourself a petri dish for breakouts.

Personally, I have been hit pretty hard by maskne and have started to notice pimples on my chin & surrounding my mouth. If you’re like me and have to constantly wear three layers of masks on your face (an N95 topped with a surgical mask to keep it clean, plus a face shield), you’ve probably started to breakout, too.

Unfortunately, masks aren’t going anywhere anytime soon, and since we can't—or shouldn't—stop wearing masks for the foreseeable future, it’s probably time that we do something about this and start treating our maskne!

Here are 5 of my own personal tips to help you combat your maskne:

  1. Wear a mask that is 100% cotton. This is a good compromise because it allows your skin to breathe a bit. Before you buy your next mask off Etsy, from your neighbor, or reach into that donation bin at work, look at the tag to see what it’s made out of. 

  2. Wash your mask DAILY! This one may be a bit obvious. As the temperature rises and you sweat more, you’ll need to keep your mask clean. You don’t want all of that oil, sweat and dirt to sit there and then get reapplied to your face constantly. Think about all of the microbes that have been growing in the weave of the fabric. We are wearing the same mask every single day. In addition to hand hygiene, we should be focusing on mask hygiene, folks!

  3. Breakup with makeup. Personally, this one has really worked for me. Since no one can see my face anyway, I’ve found makeup to be virtually pointless these days. However, if you can’t live your life foundation-free, dermatologists recommend using a tinted, fragrance-free moisturizer. 

  4. Exfoliate! There are so many benefits associated with exfoliating. It helps to remove debris, dead & dry skin, unclogs pores, and cleanses & nourishes your skin. I guess you could say it’s a form of detoxification for your face.

  5. Use a disinfecting mouthwash throughout the day. I don’t know about you, but I have become an obligatory mouth breather nowadays. Our mouths are swimming in bacteria, and it’s true that the bacteria in our mouths exacerbate the acne on our face. When we exhale bacteria through our mouths, our masks are blocking and trapping this bacteria and shooting it directly onto our faces. Yuck! I have started to bring a travel size bottle of mouthwash in my work bag and intermittently rinse my mouth through my +12-hour shift. I am telling you, it works!

To purchase this mask: CLICK HERE!

Comment
Screen Shot 2020-07-07 at 4.42.51 PM.png

Let's Talk: Ostomies

July 7, 2020

What is an ostomy?

An ostomy is a surgery that makes an opening to the tummy in order to let stool (poop) escape. This opening may also be called a “stoma.”

How will I know if my baby needs an ostomy?

An ostomy provides your baby with a way to excrete stool. It may be needed for a short period of time or for a long term basis. Indications for an ostomy may include:

  • Imperforate anus

  • Ulcerative colitis

  • Crohn’s disease

  • NEC

  • Injured bowel

  • Bowel obstruction

  • Volvulus

  • Perforation

What will the ostomy look like?

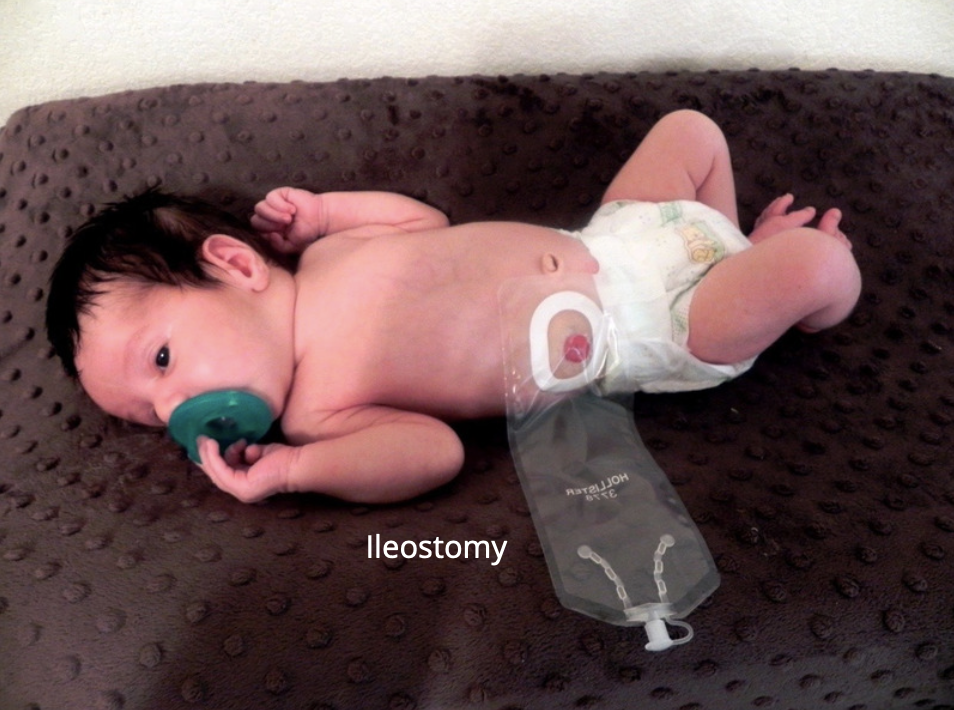
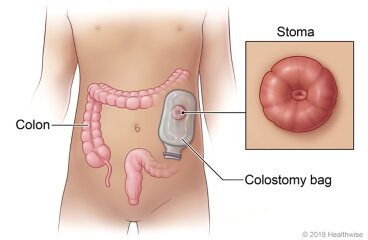
The stoma will look red, round, and wet—sometimes referred to as “meaty.” It may be raised slightly above the skin, and a little bleeding is completely normal.

Are there different kinds of ostomies?

YES! In the NICU, there are TWO very common types of ostomies that our babies receive.

  1. Ileostomy — This stoma opens from the small intestine and will be placed on the right side of your baby’s abdomen. The stool that is voided and seen in the bag may be liquidy, watery, or runny because it has barely started the digestive process. 

  2. Colostomy — This stoma opens from the large intestine and will be located on the left side of your baby’s abdomen. This stool will be more pasty and soft and not as loose. It is normal for variations in color and content. Gas is also commonly seen in colostomy bags.

Screen Shot 2020-07-07 at 4.36.26 PM.png
Screen Shot 2020-07-07 at 4.35.26 PM.png
Screen Shot 2020-07-07 at 4.37.30 PM.png
Screen Shot 2020-07-07 at 4.38.05 PM.png
colostomy1.jpg

What should I expect after the surgery?

After surgery, it is normal to see large quantities of stool excreting from the stoma. A fresh, new stoma may look swollen, mushy, and irregular in shape. It may take several weeks for the swelling to subside. Your child may have some pain and discomfort following surgery and will be given pain medication by the NICU staff. In addition, your baby cannot regulate and control the flow of stool coming out of the stoma, so a pouch (bag) must be placed to collect the stool. Stool can irritate the skin around the stoma, so it is important to keep the skin clean & dry, ensure a properly-fitted wafer that has a good seal between the wafer and skin, change the dressing when it starts to lift or leak, and empty the bag often.

What are some signs/symptoms of an infection?

  • If the stoma turns pale, purple, black, or any color variation besides red

  • More than normal amounts of bleeding

  • Fever 

  • More than normal or less than normal quantities of stool

  • Vomiting

  • A rounded, distended and/or firm, hard tummy that’s tender to the touch

  • If the stoma suddenly changes shape (after the 3-4 week post-op period)

Comment
Screen Shot 2020-07-06 at 1.32.06 PM.png

Baby Steps to Home

July 6, 2020

DISCHARGE DAY!!!

Holy Cow! It probably felt like this day would never come. However, at the same time I bet it literally snuck up on you and took you by surprise. Crazy how that happens, right? You may have been here once or twice before. I’m sure there were several instances when discharge day would approach and then slowly but surely it would slip out of your fingertips due to a frustrating infection or a pesky spell.

Many parents feel overwhelmed the week leading up to discharge. Although they long for the day when they can finally take their baby home, they may feel apprehensive and unprepared when that day finally gets here. You are probably going crazy with mixed emotions, hormones, and feeling ALL THE FEELS! 

As the NICU staff is preparing your baby for discharge, you may have realized that you yourself are not even close to being ready for your transition home. This is completely normal and to be expected.

You might find yourself asking, “How often should I give my baby a bath? What is an abnormal temperature indicative of? When should I phone the pediatrician versus call 911?” Rest assured because I have all the answers for you!

Baby Steps to Home is a resource that was created to standardize the discharge pathway and teaches you everything that you need to know before your baby goes home. It is designed to provide parents with information appropriate for their baby’s condition and progress toward discharge. The topics are updated every year and use current, evidence-based information that’s written for parents and presented in easy-to-understand language. The parent-focused content discusses common issues and problems parents may encounter, addresses commonly asked questions, and provides helpful information and tips parents will need upon discharge.

Screen Shot 2020-07-06 at 1.32.16 PM.png

NICU nurses use this handy dandy resource to educate parents about the basics of taking care of their baby. It is a really dense and thorough guide that covers literally everything that parents (especially first time parents) must know. Wanna hear the best part? It’s FREE! This is not a drill, folks! I strongly urge & highly encourage you to download this guide and take some time to really read through it before your little one comes home and you don’t have a minute to spare.

Parents are essential to maximizing the long-term outcomes of NICU patients, and it is important for you to be confident and competent when it comes to caring for your baby. CLICK HERE to download your copy today!

Comment
Screen Shot 2020-06-28 at 8.41.36 AM.png

Tracheostomies

June 28, 2020

What is a Tracheostomy?

A surgical (artificial) opening directly into the trachea (windpipe) to establish an airway. A tracheostomy tube is inserted and connected to a mechanical ventilator or another oxygen delivery device. The tube is inserted through a cut in the neck below the vocal cords. This allows air to enter the lungs.

Tracheostomy Care Includes:

  • Inspecting the stoma daily (every 12 hours or per facility policy) and PRN.

  • Assessing for irritation, infection or inflammation.

  • Removing the inner cannula for inspection and cleaning. Dirty cannulas should be cleaned and left to air dry.

  • Assessing for odor.

  • Check for secretions, noting color, quantity, & consistency (e.g. thick, white, clear, copious, scant, etc.).

  • Assessing the need for suctioning.

  • Providing daily oral care.

  • Changing the exu-dry dressing Q 12 hours & trach ties Q 3 days + PRN (when visibly soiled). Avoid dressings that trap moisture as this can cause maceration.

Why do NICU babies receive tracheostomies?

There are a variety of reasons why an infant may need a trach, ranging from a narrow airway to the need for long-term mechanical respiratory support from a ventilator. The most common reason is to relieve severe breathing difficulties due to chronic respiratory failure, bronchopulmonary dysplasia, and/or chronic lung disease from long term ventilator support.

Can babies with a trach eat?

In most cases, a baby with a tracheostomy can eat and drink without any trouble once they have recovered from the surgery. A speech pathologist and/or occupational therapist should assess the baby’s ability to swallow before he/she is given any food or drinks.

Can babies talk/vocalize with a trach?

Babies may have a speaking valve attached to the end of their tracheostomy tube. This one-way valve directs exhaled air through the trachea and upper airway, helping the baby to coo and cry.

Will my baby develop appropriately with a trach?

During your baby’s development, he will begin to make mouth shapes and early sounds like kisses and blowing raspberries. These sounds should be encouraged and will lead to the development of more speechlike sounds over time. Babies communication options will depend on the airway and the reason for the trach.

DISCHARGE

Before a baby is discharged, it is important for parents to be fully confident and competent with trach management. NICU nurses are trach gurus and are responsible for teaching and educating parents about EVERYTHING including:

Trach care & skin care around the trach

Trach suctioning

Trach changes

Home ventilator management

Safety and emergency situations (e.g. dislodgement)

Organizing family needs and supplies

Easing the home transition

Comment
IMG_2124.JPG

I Got My Antibodies Tested (again)

June 16, 2020

If you are a loyal and active follower of my blog, you know that I got my SARS-CoV-2 antibodies tested way back in the beginning of May. You probably also know that my results came back negative.

However, what you DON’T know is that just this morning, I went and got my antibodies retested again! Why, you ask? For research!

Unless you’ve been sheltering in place under a rock, you know that we are currently in the midst of a pandemic. My employer is one of the many hospitals around the world that is interested in learning more about the spread of coronavirus. A few days ago, my hospital started conducting a research study on its employees—on a completely voluntary basis, of course—with the goal of testing our antibodies.

COVID-19 has been spreading like wildfire in the Central Valley, and we currently have very limited data and knowledge about the virus. Since much is unknown regarding how long antibodies to the virus remain present in the body after infection and whether they provide any immunity or protection whatsoever, my employer decided to conduct a research study. Pretty sweet, huh?

Antibody testing provides knowledge about whether or not a person has been exposed to the virus at one point in time even if there were no symptoms present. It may not necessarily mean the person is immune, per se, to getting the virus again in the future. This test promises answers for many curious people like myself who are wanting confirmation that we have or have not been exposed to the virus.

More importantly, however, getting my antibodies tested presents an opportunity to study the immune response in healthcare workers who are considered a high-risk group in terms of exposure to COVID-19. It will also provide indirect evidence of past exposure or infection. This knowledge will help guide the best care for our patients and their families. By deepening our knowledge of the body’s response to COVID-19, we can not only share this information with others, but also help to contribute to the medical community’s overall understanding of COVID-19.

Although there are no direct benefits to participating in the study, the indirect benefit is contributing to the general knowledge and learning more about its spread.

The results from this morning’s test took about six hours to arrive in my patient portal. As expected, there were no surprises. My results came back negative, yet again. 

A negative result opens up the doors to so many possibilities and the potential that I could still get sick if I’ve been exposed. It really didn’t provide me with any clarity or answers except for the fact that I guess am doing a pretty darn good job at this whole social distancing thing. I still plan to err on the side of caution as businesses and local establishments open back up, but I do have a little peace of mind knowing that I haven't been around any infected individuals.

Stay safe and healthy, everybody!

Comment
Screen Shot 2020-08-15 at 9.18.19 AM.png

Chest Tubes

June 14, 2020

There were many subjects that I couldn’t quite wrap my brain around during nursing school. One of them being CHEST TUBES! I remember feeling so dumb and embarrassed in class. Everyone else understood the concept just fine whereas I couldn’t comprehend it for the life of me. “Is bubbling good or bad?” “Is the water seal chamber on the right or left?” So. Much. PTSD. Good times… It wasn’t until I actually started working with them on a daily basis in the NICU where it all finally clicked and the lightbulb turned on.

WHY ARE CHEST TUBES PLACED?

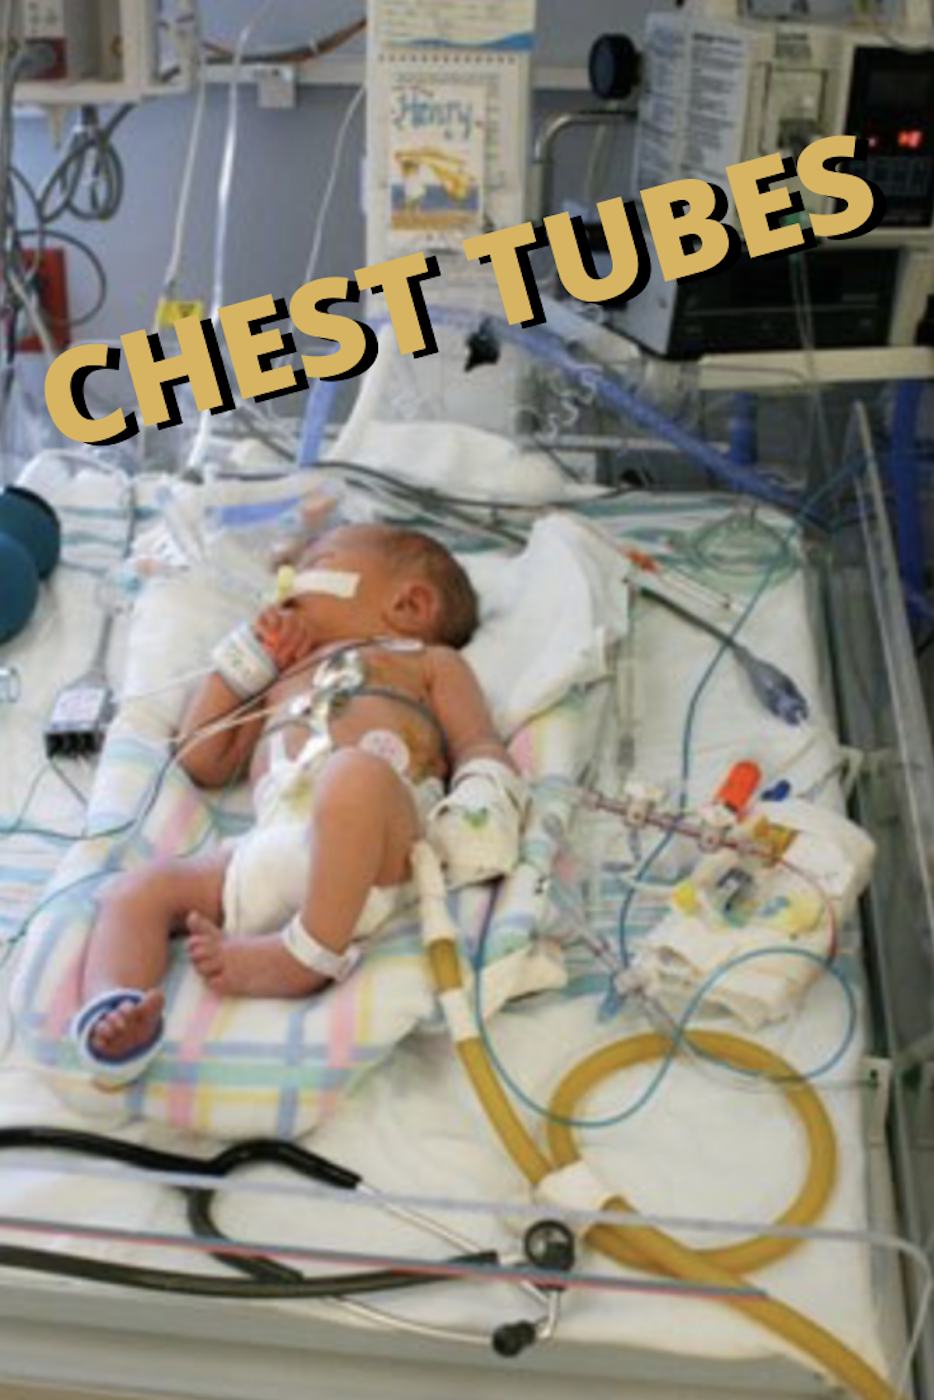
Chest tubes are placed in babies as a means to provide relief of respiratory distress associated with various conditions & etiologies.

Clinical indications for a chest tube include:

Pneumothorax. An air leak in the pleural space, causing the lung to collapse due to compression.

Hemothorax. The same as above but with blood in the pleural space instead of air.

Empyema. A collection of pus in the pleural cavity.

Pleural effusion. Fluid excess in the pleural space.

Chylothorax. An accumulation of chyle in the pleural space.

Post operatively as a surgical drain following cardiac surgery, a thoracotomy, or mediastinal surgery.

How does a chest tube work?

A chest tube is placed in the pleural or mediastinal space in order to restore the negative intrathoracic pressure needed for lung re-inflation. This involves draining/removing any fluid, blood or air that has accumulated and may be compressing the lung(s). The tube is connected to a drainage system that uses gravity and/or suction to remove the foreign substance and to prevent the air from re-entering. This helps with re-expansion of the lung(s) and helps to restore the negative pressure in the pleural space. Without intervention, this may lead to serious respiratory or circulatory compromise and rapid deterioration of the baby.

WHAT ARE THE COMPONENTS OF A CHEST TUBE?

  1. Drainage collection chamber. This monitors the drainage color and amount. Depending on the age and size of your baby, the normal hourly output varies. This chamber is on the right side, just below the tube that is coming from the patient.

  2. Water seal chamber. Water will fluctuate with inspiration and expiration. This chamber must be filled and maintained at the 2cm level to ensure proper operation. It should not be overfilled, as it is more difficult to get air out of the pleural space when this occurs. The water-seal chamber serves as a one-way mechanical valve that allows air to leave the chest and prevents it from re-entering the patient. A small amount of intermittent bubbling is normal. Continuous, turbulent bubbling can indicate an air leak.

    —> Note: If water does not fluctuate, the lung has either re-expanded or there is a kink.

  3. Air leak monitor. Excessive bubbling in the tubing proximal to the baby (i.e. the tubing coming out from the insertion site) indicates an air leak. It could be that the occlusive dressing has lifted and air is entering through the chest incision. If your patient has a pneumothorax, intermittent bubbling may be seen and is considered a normal finding.

  4. Suction control chamber. This is filled with water. Remember, the height of water is what controls the amount of suction! Bubbling is expected in this chamber as it indicates that an appropriate amount of suction is being used. This chamber is located on the left, just below the tube that is connected to the wall suction.

TROUBLESHOOTING TIPS

There are many types of chest tubes, including percutaneously inserted pigtails, or larger, surgically placed chest tubes. Regardless of the type or brand, great care and caution should be taken as they are very flexible and prone to kinking, clotting, and/or dislodging!

It is important to avoid kinks or pressure in the tubing. In nursing school, they drill in your brain the importance of not milking or stripping the tubing. This is a true statement! Unless you have an MD order, only the physician or surgeon can do this. Also, do not lift the drainage system above the patient’s chest because the fluid may backflow into the pleural space. If the tube becomes dislodged, cover the area with a sterile dressing taped 3 sides down so that air can escape but not enter.

In order to prevent accidental disconnection and/or contamination, secure the tubing to the bed linens (with a rubber band & safety pin) to ensure it has a straight flow to the collection chamber and has no dependent loops or kinks. The chamber should be taped to the floor in an upright position. NEVER clamp a chest tube and do not pinch/occlude it when checking patency!

COMPLICATIONS

There are many complications to watch for following chest tube placement. Some of these include:

  • A tension pneumothorax. May be caused by a clamped chest tube. Signs & symptoms include mediastinal shift to the unaffected side, reduced venous return, increased respiratory distress, dysrhythmias, diaphoresis, tachycardia, hypotension, absent breath sounds on the affected side, chest pain, and dry cough. Tracheal deviation is a late sign and may not always be present.

  • Hypovolemic shock from excessive chest tube drainage. This can occur if the fluid replacement is not enough to meet the baby’s needs. Signs & symptoms include hypotension, tachycardia, diaphoresis, cool skin, and decreased capillary refill.

  • Air leak. Signs & symptoms of an air leak within the closed system include absence of drainage, absence of fluctuations in the water-seal chamber, or continuous bubbling in the water-seal chamber.

What is Tidaling?

Fluctuations in the fluid level (tidaling) occur when pressure changes in the pleural space (e.g. when the patient breathes). During inspiration, as negative pressure increases, so does the water level. During expiration, negative pressure in the pleural space decreases as does the water level. If a patient is on a mechanical ventilator, you will observe the opposite effect in the water column. This is due to the positive pressure inside the lungs applied by the vent instead of the negative pressure that normally occurs with non-assisted breathing.

chest-tubes-overfilled.jpg

Chest Tube Management

  1. After the MD places the order, the first thing you should do is gather all of the supplies and prepare your collection container.

  2. Fill the water-seal chamber with the prefilled syringe that comes in the package of the chest tube drainage system. This will allow the detection of air leaks. However, if the chamber is not filled, the system is still sealed.

  3. Maintain the chamber in an up-right, secure position. It may be best to tape it to the ground or hang it on your patient’s bed frame… NOT THE RAILING!

  4. For continuous suction, set the dial in the drainage system to the cm H2O ordered by the MD.

  5. Set the wall suction to 80-120 mmHg. When suction is applied to a closed chest drainage system and attached to the patient, the orange bellow indicator on the front of the collection chamber will expand past the indicator mark on the chamber.

  6. The regulator on the system is pre-set to -20 cm H20. This can be adjusted via turning the rotary dial to the setting ordered.

  7. For water seal, no suction is necessary. To place a chest tube to water seal from suction, simply turn off the wall suction. In other words, the system is considered to be at water seal if it is not attached to suction or if the suction is turned off. You DO NOT need to disconnect the drainage system from the wall suction. If your patient does not tolerate water seal and needs to be restarted on suction, your tubing is already connected and ready to go. Some patients may need to be restarted on suction if the chest x-ray demonstrates recurrence of the problem.

  8. The initial occlusive dressing should be placed by the MD. However, if the dressing becomes loose, saturated, soiled or begins lifting, an RN is able to perform the subsequent dressing changes as long as there’s an order. The occlusive dressing consists of two split drain sponges around the chest tube, followed by a gauze dress on top and then a semipermeable transparent dressing over that (example: tegaderm). This ensures a closed, sterile drainage system!

4 Comments
Screen Shot 2020-06-11 at 9.19.09 AM.png

Mastering IV Skills in the NICU

June 11, 2020

This was the most requested topic from this week’s poll!

Some of the many responsibilities of a NICU nurse include drawing our own labs and starting our own IVs. We do not have the luxury of paging the phlebotomist like the other units do in the rest of the hospital. And that goes for every NICU—since it’s such a unique and specialized unit. Fortunately, this means that NICU nurses get really good at starting IVs on our teeny tiny micro-preemies who have fragile, practically non-existent veins.

In nursing school, I wasn’t given much practice with IV starts except for during my ED rotation. I remember the nurse who I was paired with asking me what the one skill was that I wanted to focus on that clinical day. I told him that I really wanted to attempt to start an IV on a patient for the first time, because up until that point, I hadn’t been given the opportunity. I kid you not, he made me start at least 10 IVs that day. We went around the entire emergency room helping out all of the other nurses, asking them who needed IVs. This was such a great experience because it really helped me to become more comfortable with my skills and technique.

For those who haven’t really learned much about inserting IVs, or haven’t had much practice, follow these simple steps to help you master your IV skills. Disclaimer, most of these tips are NICU specific:

  1. Learn the anatomy of your baby and spend some time shopping around. It is essential to look methodically for suitable veins to avoid unnecessary pokes.

  2. Choose the site carefully, aiming to avoid an excessive number of attempts.

  3. Apply a tourniquet (or rubber band) around the limb of choice, proximal to the body.

  4. Inspect and palpate the vein that you plan on using.

  5. Use heel warmers or warm blankets for difficult-to-find veins. The heat really helps to make them pop out at you!

  6. Use a vein viewer to help you find those super deep veins. However, sometimes the light distorts the vein, so use this gadget with caution.

  7. Choose a vein that is as straight as possible. Squiggly veins with valves are very difficult to hit and you might cause trauma if you’re not careful.

  8. If possible, lower/dangle the baby’s limb below his body to help with the blood flow.

  9. Choose the appropriate size needle—in the NICU we use a 24 gauge (yellow packaging) for our peripheral IVs.

  10. Scrub the IV site vigorously. ChloraPrep is the preferred disinfectant used to clean the skin prior to insertion. Cleaning will also help make the vein stand up and say “hello!”

  11. Pull traction on the skin below so the vein doesn’t roll. AKA pull the skin taut.

  12. Insert the needle SLOWLY in a 10-15 degree angle. Most veins are very superficial.

  13. Make sure that the bevel is facing upward.

  14. Once you see flashback, advance the catheter until you are completely in the vein.

  15. Remove your tourniquet and watch your chamber fill up beautifully!

Important IV MANAGEMENT TIPS:

  • Every hospital has a different policy in place that delineates how many attempts a staff member can have until he/she must defer to someone else. In my NICU, an RN can attempt to start an IV twice. After FOUR TOTAL unsuccessful attempts, we HAVE to page the MD for further instruction.

  • Unlike central line placement, starting a peripheral IV is not a sterile procedure. You may use aseptic or clean technique.

  • An IV start is a very painful and traumatizing procedure for the infant. It is important to provide pain relief several minutes before you attempt to start the IV. This can be done via non-pharmacological measures such as oral sucrose and a pacifier.

  • Swaddle the rest of the baby’s body except for the extremity being used for the IV. This provides containment, comfort, and has a calming effect.

  • Provide a neutral thermal environment and prevent cold stress. Cold veins collapse and shrivel up, which is not ideal for IV insertion.

  • You will be monitoring the IV like a HAWK and performing an hourly touch-look-compare assessment. IVs in neonates typically only last 24-48 hours due to their weak and fragile vasculature. If phlebitis, induration, leaking, extravasation, or swelling is noted, remove the IV immediately and notify the provider.

  • Compared with adults, the veins in babies are smaller and poorly supported by surrounding soft tissue. A premature or sick infant may require multiple IVs during a prolonged stay. Thus, if the baby is going to be on an IV antibiotic or pharmacologic regimen for a long period of time (e.g. at least a week), the bedside RN should ask the MD to see if the baby qualifies for a PICC line. PICC lines are used for long-term treatment rather than a temporary solution for a short course of IV meds. They last so much longer than peripheral IVs and would be much more beneficial to the baby needing chronic IV therapy.

Comment
Screen+Shot+2020-06-10+at+3.15.59+PM.jpg

Caput Succedaneum

June 10, 2020

In the NICU, we see many babies who have suffered some form of head trauma or injury during birth. One of the most common types being Caput Succedaneum!

What Is It?

Caput succedaneum—caput, for short—is the formal medical term for the area of localized swelling or edema which is commonly present on the head of a newborn following vaginal delivery. This is a very common and usually benign neonatal condition resulting from normal pressure and compression on the baby's head as it passes through the birth canal. Caput itself is harmless and merely indicates that the baby went through a particularly difficult and stressful delivery. The swelling is limited to the scalp and is not a symptom of a deeper injury to the skull or brain. Although caput is nothing to worry about and quickly resolves, it can lead to other complications including jaundice or hydrocephalus.

4omr2nk3i4tz.jpg

Which Babies Are at Higher Risk?

In a normal vaginal delivery, the baby is pushed through the birth canal head first. This makes the top of the head the focal point of significant pressure as the baby progresses through the very narrow birth canal. These pressures are greater for babies that are large for gestational age and have a higher-than-normal birth weight (also known as macrosomic babies). Babies who undergo a prolonged, difficult birth are also at risk. Caput can also be triggered by the use of a vacuum extractor or forceps to facilitate a vaginal delivery.

What are the Symptoms?

The primary symptom of caput is a boggy, swollen, puffy, soft spot on the top of the baby’s head just under the skin of the scalp. The area may appear on one particular side or extend across the middle of the scalp.

What is the Treatment?

Caput is not a medical emergency nor is it usually a condition that requires any treatment. The baby will almost always make a complete recovery after just a few short days.

Caput-Succedaneum-vs-Cephalohematoma.jpg

Is Caput the Same as Cephalohematoma?

No! The difference between the two stems down to location and type of bleeding. In cephalohematoma, serosanguineous fluid (blood) is collected between the periosteum of the skull and the skull bone itself, so it does not cross suture lines. In other words, cephalohematoma occurs in a deeper, more vascular portion of the scalp. This type of bleed is very slow in nature; signs and symptoms are not usually present at birth and develop hours-to-days after delivery. A firm, enlarged unilateral or bilateral bump covering one or more bones of the scalp characterizes the lesion. Cranial sutures clearly define the boundaries of the cephalohematoma, compared to caput which can cross the suture line. In comparison, caput involves diffuse swelling of the scalp, with subcutaneous fluid collection unrelated to the periosteum with poorly defined margins. Additionally, caput succedaneum is a highly common birth injury while cephalohematomas are very rare.

Screen Shot 2020-06-10 at 3.22.48 PM.png

Questions? Comments? Concerns? Clear as mud? <3

1 Comment
gettyimages-rbma-0019-1522860043.jpg

Congenital Syphilis

June 10, 2020

What is congenital syphilis?

Syphilis is a sexually transmitted infection (STI) caused by a certain type of bacteria (treponema pallidum). When a baby acquires syphilis from his mother, it’s called “congenital” syphilis. In other words, congenital just simply means that it’s present at birth. If mom has syphilis, she will pass it to her baby during pregnancy and/or during vaginal birth. The baby will come in direct contact with the syphilis sore, ultimately infecting him/her. If you have syphilis during pregnancy and don’t get treated, it may cause serious problems for your baby, including death.

Babies with congenital syphilis are admitted to the NICU for many reasons. For one, this bacterial infection is often directly associated with drug and/or alcohol exposure in utero. Whenever the baby’s care team suspects substance abuse in addition to the STI, an extra thorough physical assessment is conducted & extra precautionary steps are performed for the safety of the newborn.

Congenital syphilis can cause complications for your baby during pregnancy and after birth. Your baby may seem healthy at birth, but syphilis may cause health complications later if he doesn’t get treated right away. 

Complications during pregnancy may include:  

Miscarriage

Premature birth

Fetal growth restriction (also called growth-restricted or small for gestational age) and low birthweight.

Problems with the placenta and the umbilical cord.

Stillbirth

Complications after birth may include:

Neonatal death

Fever

Anemia

Rashes/lesions/sores

Runny nose

If not treated right away, congenital syphilis can cause problems for your baby later in life, including:

  • Deformed bones and/or problems with bones and joints, including pain, swelling and conditions like saber shin, saddle nose and Hutchinson teeth. A bone survey will be performed while your baby is in the NICU to examine his/her bones.

  • Brain and nerve problems, such as blindness and deafness. An eye exam and hearing screen will be performed to assess these vital organs.

  • Developmental delays. Your child may not reach developmental milestones at a certain age when expected.

  • Problems with the spleen and liver, including jaundice (click here) and hepatosplenomegaly (enlarged spleen). An abdominal ultrasound and X-rays will be performed while admitted in the NICU.

  • Meningitis. A lumbar puncture (spinal tap) will be performed to assess the CSF while your baby is in the NICU.

How is congenital syphilis treated?

The infection will be treated with the antibiotic called penicillin G. Depending on the extent of the exposure determines how long your baby will be treated with this medication.

Can you prevent your baby from having congenital syphilis?

Yes! Congenital syphilis is completely preventable. You can protect your baby from the infection by getting tested and treated early during pregnancy. Prenatal care is essential to the overall health and wellness of you and your baby.

Comment
IMG_2003.jpg

Preemie Preparation

June 9, 2020

Many people often forget that the NICU is an ICU—meaning that these babies are critically ill and require a high level of expertise and care. NICU nurses touch the tiniest of lives and help parents to make their worst days a little bit better.

Taking care of a sick newborn can be VERY intimidating and nerve-racking, especially if you don’t have a ton of experience working with them in the first place.

Personally, I didn’t have much experience with babies and hadn’t been around them a whole lot before I started working in the NICU. Let me tell you, I was TERRIFIED! Not only of the micro-preemies but also the full-term relatively healthy babies, too! Oh, and the parents...

However, with time and experience (and wisdom from those who had been working in the NICU for the majority of their careers)... I became comfortable and realized exactly how amazing these fragile beings truly are.

Unfortunately, there isn’t a “baby manual,” and most hospitals don’t offer a newborn basics class. But, there are a TON of educational resources available online... everything from books, peer-reviewed journals, evidence-based articles and experience-based options—all of which are very informative and helpful!

Having a tiny creature to take care of really changes your life, and I don’t think there are enough ways to prepare for it. If you’re an expecting parent, soak up all of the information you can get your hands on before your little one gets here. That way you will feel a little more prepared when your baby makes his or her grand debut into the world. Start EARLY since you may be recovering from labor/delivery and running on very little sleep! Yes, you will be waking up every 2-3 hours to feed your baby. Cue the deer in headlights!

Did your baby need NICU care? Are you a first time parent? Tell me your story!

Comment
Screen Shot 2020-08-17 at 12.10.46 PM.png

Chlorhexidine Gluconate (CHG)

June 9, 2020

What is CHG?

Chlorhexidine gluconate (CHG) is a very strong and effective cleaning product that kills germs. It works by reducing resident microbial count. Daily baths with CHG helps to prevent the spread of infections in hospitals.

In the NICU, we use CHG bathing as a strategy to reduce central line-associated bloodstream infections (CLABSIs). NICU babies with central venous catheters (PICC lines, Broviacs, etc.) will receive a CHG bath every other night. In addition, “pre-op” prep for NICU babies who are getting ready for surgery consists of a CHG “wipe down” bath. This is performed using 2% CHG cloth wipes, unless contraindicated.

Contraindications for CHG include: 

  1. CHG allergy (duh)

  2. Severe skin breakdown, rash or burns

  3. Patient undergoing radiation

  4. Patient receiving phototherapy

  5. Patient on a warming table

  6. Infant less than 2 months of age (corrected gestational age <48 weeks)

These infants will be bathed via soap & water or via non-CHG cleansing washcloths.

Key Points:

  1. If the patient is visibly soiled, bathe him/her with soap & water prior to using the CHG wipes.

  2. As a general rule of thumb, always wipe from head to toe—OR from the cleanest part of the body to the dirtiest.

  3. Dispose of the cloths after cleaning each body section to avoid contamination.

  4. Avoid using these wipes on the patient’s genital (“peri”) area & the face—they can be very irritating to these areas.

  5. If skin redness or itching occurs and does not resolve, notify the provider. The baby may need to be rinsed off and/or lotions/moisturizers may be applied.

  6. Each package of wipes contains 2 CHG wipes, and it is important for both wipes to be used when bathing the infant!

Comment
Screen Shot 2020-06-06 at 10.40.26 AM.png

How to Get Into Nursing School

June 6, 2020

My DMs are often frequented with aspiring nursing students seeking tips and suggestions on how to get into nursing school. If only you could rub a magic lamp and genie Natalie appears and grants your wish. Unfortunately, I cannot present you with an acceptance letter. However, what I can do is spill some juicy secrets and provide tips for some awesome application boosters to help you stand out from the HUNDREDS if not THOUSANDS of applicants that nursing schools sift through!

ATTENTION HIGH SCHOOL SENIORS, IF YOU ARE LOOKING FOR THE STEPS ON HOW TO BECOME A NICU NURSE, CLICK HERE!

Healthcare is booming. There is never a shortage of sick people (or newborns) nor will there ever be enough nurses. As demands for healthcare continue to increase, as does the shortage of nurses. Why? Money! It take a lot of time and financial resources to train a brand new nurse. That said, it is important to make yourself as marketable & desirable as possible. If you have decided to begin your journey to becoming a registered nurse, this post is designed specifically for you ♥

So, let’s address the obviously question: How do you get into nursing school?

NATALIE’S PERSONAL NURSING TIPS

Screen Shot 2020-06-06 at 10.40.47 AM.png

1. NEVER GIVE UP!

For starters, DO NOT give up! Keep persevering and stay determined. Don’t lose focus and do NOT let anything stop you or get in your way! If you know you are meant to be a nurse, GO FOR IT! I am here to tell you that you can do it! Motivation is the key to success! I knew that nursing was my calling. Therefore, I never gave up! That is my advice to you. Find a way to make it work! You may have to go far above the call of duty. Work another job, volunteer more often, retake a class or two to get the better grade, look into other cities (or states), commute a long distance, sacrifice social life, minimize distractions, forego family time, etc. I did all of the above and it was SO worth it!

Screen Shot 2020-06-06 at 10.41.22 AM.png

2. RE-TAKE THE CLASS

If you have to, just do it! Don’t feel embarrassed or ashamed, and please don’t beat yourself up. Nobody is going to know. I had to retake two classes during undergrad because I received poor grades. I struggled in Statistics and Microbiology and got “C’s” my first go around. I retook the courses during summer terms and ended up with “A’s!” Wanna know a secret? Sometimes, professors are much more lax & laid back and the curriculum is WAY easier during summer terms. Was it fun? No! Was it time consuming? Yes! But it was so worth it seeing that shiny “A” on my transcripts. Boosting those grades was key for my application to nursing school.

Screen Shot 2020-06-06 at 10.41.44 AM.png

3. PRACTICE PRACTICE PRACTICE YOUR INTERVIEW

Some nursing schools require an entry interview. Fortunately, mine did not. If this is the case for you (and it will be for your first job, too) I suggest you start preparing now! Practice, practice, practice! I was horrible at interviews! I was the nervous, sweaty type who would always overthink and ramble on and on and on with overwhelming feelings of what to say. But I practiced! If I stumbled over words, I re-practiced questions until I had my answers memorized! It wasn’t until I started my job, joined the interview committee, and was able to sit on the OTHER side of the table when I finally started to feel confident about my interview skills. For a list of commonly asked questions for new grad RN positions in the NICU, click here!

Screen Shot 2020-06-06 at 10.42.01 AM.png

4. VOLUNTEER

Make time in your ALREADY overly busy schedule to volunteer in your community. Community service is the perfect selfless act that shows how you go the extra mile. This is what nursing school directors love seeing! They know your schedule is already jam-packed, but showing you care enough to find time to give back to a special cause that’s close to your heart really sets you apart from other applicants. Find something you are passionate about. Whether it be children’s health, Red Cross, the Heart Association, student leadership, homeless shelters, hospital work, or veteran’s causes—there are so many organizations that could greatly benefit from your service and desperately need your help! I volunteered at a local Alzheimer’s center and cooked food for homeless shelters during my undergraduate career. These were awesome experiences that helped me to shine on my application and proved that I was a well-rounded candidate.

Screen Shot 2020-06-06 at 10.42.24 AM.png

5. WORK IN THE FIELD

Take on a part-time job as a CNA, scribe, volunteer, secretary, etc. Working directly in a hospital can give you great "in field" experience, offer opportunities to learn about units first hand, and most of all, NETWORK! You will have opportunities to meet nurses, staff, hiring managers, etc. A face to a name is SO important!

Screen Shot 2020-06-06 at 10.42.53 AM.png

6. MAKE SEVERAL BACK UP PLANS

And a back up for your back up plans. Personally, I had plans A, B, & C. If I wasn’t accepted into my first choice, I had alternate back up schools and programs already planned out. There are so many options out there. If something isn't working, make plans for your next move. STRA-TE-GIZE!

Screen Shot 2020-06-06 at 10.43.13 AM.png

7. GO THE EXTRA MILE

Many schools require different curriculum, and some classes that transfer to one school may not be transferable to another. One school may require a particular class or lab, but another may require a different one. I opted to take that extra lab or course just in case I needed it for another school. Through this, I actually learned more! Some classes I decided to take actually helped my overall nursing thought process and taught me MORE than I had previously anticipated! Planning ahead and going the extra mile can make a big difference.

Screen Shot 2020-06-06 at 10.43.28 AM.png

8. SHOOT FOR THAT BSN DEGREE

Although this is not a hard and fast rule, most new grad programs (in teaching hospitals, Level I trauma centers, Children’s hospitals, Level IV NICUs, etc.) require a “Bachelor of Science in Nursing” degree. In addition, most hospitals are moving toward becoming "Magnet" certified. Magnet is a nationwide program focused on improving patient outcomes with improved nursing engagement. Part of this includes hiring and having a Bachelors prepared nursing staff. Healthcare is focused on having more highly educated staff members. Therefore, many hospitals are requiring nurses to return to school in order to obtain this degree. In addition, opportunities for advancement (Management, Education, etc.) require advanced practice nurses. My advice is to pursue that BSN! I promise you won’t regret it!

Comment
IMG_1944.JPG

What is Gastroschisis?

June 4, 2020

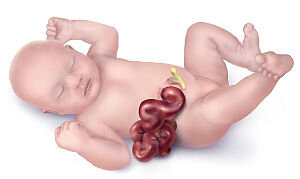
Pronounced GAS•TROW•SKEE•SIS, this is an abnormality that occurs during fetal development. Gastroschisis is a centrally located, full thickness abdominal wall defect ___ that results in the incomplete formation of the abdominal wall. This causes the intestines to exit beside the umbilicus, and the umbilicus remains intact and located just to the left of the defect. The baby’s bowel pushes through this hole (on the right side of the belly button) and proceeds to develop outside of the body. This birth defect can vary in size—anywhere from a small portion of the intestine to a significant defect encompassing the intestine, pancreas, liver, uterus, fallopian tubes, etc. Gastroschisis is usually an isolated defect and is not typically associated with other abnormalities or malformations.

gastroschisis_a_enIL.jpg

What Causes Gastroschisis?

The exact cause is not known. It does not appear to be inherited. Having one baby with gastroschisis does not make it more likely that you would have another baby with the condition.

In nursing school, you learn that this is a very rare condition. However, in the NICU this diagnosis is more common than you think. It occurs in about one in every 2,000 babies and develops in early pregnancy—around the fourth through eighth week. It is possible for gastroschisis to be detected in the third month of pregnancy. However, we most often perform evaluations for it at 20-24 weeks. It is most commonly diagnosed by ultrasound around weeks 18-20 of pregnancy.

An important part of the exam is determining whether the condition is gastroschisis or omphalocele. These conditions can sometimes look similar on an ultrasound. In omphalocele, a sac from the umbilical cord covers and protects the intestines that are outside of the baby’s body.

In gastroschisis, because the intestines are not covered in a protective sac, they are exposed to irritating amniotic fluid. Because the development of this disorder happens very early in the pregnancy, prolonged exposure to amniotic fluid causes the bowel to become thick, swollen, inflamed, and sometimes twisted. Once your baby is born, the internal organs will be exposed to air and remain unprotected. This makes the bowel more susceptible to infection and causes your baby to lose heat and fluids very rapidly.

Gastroschisis.png
300px-Gastroschisis-web.jpg
gastroschisis-silo_400x286.png

Sounds painful. Will this hurt my baby?

The abnormality itself does not hurt. However, the process of reducing the bowel and the surgery is very uncomfortable. It will require that the baby be heavily medicated, sedated, and paralyzed with pain medication.

Okay, so your baby has gastroschisis… now what?

Luckily, this is a very treatable condition through surgery and reduction!

After your tests are complete and the diagnosis is confirmed, your healthcare team will discuss the extent of the baby’s condition and its impact on the rest of the pregnancy. They will also cover medical treatments that might be needed right after birth as well as the long-term prognosis. Overall, babies born with gastroschisis have an excellent prognosis with a survival rate of close to 100%. The team will also create a plan for the remainder of your pregnancy and will talk to you about what to expect after delivery. Your doctor may suggest a Cesarean section due to the potential risks and trauma to the bowel via squeezing through the birth canal.

Typically, after your baby is born, the pediatric gastroenterologist surgeon performs a “primary” repair by manually (and gently) pushing the bowel back into the abdominal cavity. When possible, this surgery is performed the day your baby is born.

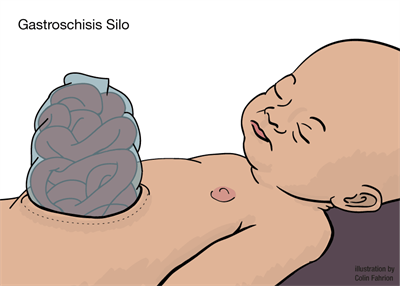
However, in a more severe or complicated case of gastroschisis, this won’t happen all at once. A “staged” repair is a slow, gradual process. The surgeon must be very careful because it can alter the pressure within the cavity, potentially risking respiratory distress and elevated blood pressures. Normally, the bowel will be reduced little-by-little on a day-to-day basis, depending on how well the baby tolerates it. This may take place over several days or weeks. The part of the bowel that remains outside of the body during this time is placed in a plastic contraption called a “silo” (pronounced sigh•low). A silo is a “bowel bag” that attaches to a bar that suspends above the baby so that the exposed organ can slowly enter into the body via gravity. Every day, the silo is tightened and some of the bowel is gently pushed inside the baby’s abdomen. When all of the bowel is inside, the belly is closed. This bag is very important because it holds in moisture and heat as well as protects your baby’s exposed bowel from external sources of contamination, trauma, or infection.

2-Figure1-1.png
download.jpg
3-s2.0-B9780323445481000206-f020-011-9780323445481.jpg

Nursing responsibilities before surgery include:

  • Hourly silo assessments (checking to make sure the dressing is clean/dry/intact)

  • Hourly inspection of abdomen. Necrotic bowel will appear discolored or block and will be visible superficially through the abdomen.

  • Auscultating for bowel sounds. Because of the intestinal abnormality, development of appropriate peristalsis and effective absorption is significantly delayed.

  • Hourly vitals (including temperature since this is a high risk for infection).

  • Maintaining the infant NPO. Your baby will not be able to eat before or after surgery for a while. IV fluids will provide your baby with the proper hydration and nourishment. TPN and Lipids supply the perfect blend of vitamins, minerals, sugar, protein, calories, and fats for your little one.

  • Maintaining infant on his/her right side to avoid strangulation due to reduction of blood flow.

  • Decompress stomach via low intermittent suction using an Anderson tube. Replace high volumes of output as needed to prevent dehydration.

  • Until surgery, we will cover your baby’s bowel with moist, warm, sterile gauze.

Nursing responsibilities after surgery include:

  • Frequent respiratory exams. These babies may have trouble breathing and will need respiratory support. Your baby may not be able to breathe effectively on his own due to the increased pressure on the diaphragm from the bowel that is now in the abdominal cavity. 

  • Hourly pain and sedation assessments. This ensures your baby is properly medicated.

  • Keeping pressure off the diaphragm. We will place a gastric tube through the baby’s nose—which is a nasal gastric (NG) tube—or mouth—which is an oral gastric (OG) tube. We will apply suction to this tube to keep the stomach empty and decompressed in order to not cause any more pressure on the diaphragm.

  • Maintaining IV access. Several IV medications will be administered following surgery. These include antibiotics to prevent infection, pain medications for comfort, and IV fluids until your baby is ready to take food by mouth.

  • Hourly bowel/GI assessment.

The hardest part of recovery for babies with gastroschisis is learning to eat and tolerating food. Your baby’s bowel has developed outside of the body. It needs to heal and adjust to functioning normally inside the body. Because of that, babies with gastroschisis commonly have feeding challenges the first few weeks of life. Before we introduce breast milk or formula, we wait for signs from the baby that the bowels are beginning to work. These signs include:

Active bowel sounds

Spontaneous passing of stool

A decrease in the drainage coming from the tube in the baby's stomach

Note: In some cases of gastroschisis, a bowel resection may be necessary. This is a surgery that is needed when a portion of the bowel is extremely damaged and necrotic. The dead bowel that does not function properly is removed and an ostomy is placed. This is an opening that allows stool to pass out of the body and into a bag. With bowel resection surgery, there is a potential risk of developing short gut syndrome.

Questions? Comments? Concerns? Was your baby diagnosed with gastroschisis? Let me know! <3

gastroschisis+in+silo.jpg
1 Comment
Screen Shot 2020-05-24 at 1.58.52 PM.png

SMOFlipid

June 3, 2020

In a previous post, we discussed Total Parenteral Nutrition (TPN) and its indication in the NICU. Here, we will talk about one of TPN’s key ingredients—Lipids—and the most commonly used form—SMOFLipid!

To review, TPN is indicated in neonates when oral or enteral nutrition is not possible, insufficient, or contraindicated. TPN is made of Parenteral Nutrition (PN) + Lipids.

A novel lipid emulsion called SMOFlipid is widely used in the NICU setting. Why? Because it provides an excellent source of essential fatty acids, energy, monounsaturated fatty acids, and omega-3 fatty acids. It is also supplemented with antioxidant α-tocopherol and has a lower, more optimal omega-6:omega-3 ratio. In other words, it is GREAT for your baby!

SMOFlipid is a mixture composed of:

  1. Soybean Oil (SO)—30%

  2. Medium-Chain Triglycerides (MCTs)—30%

    • From coconut oil or palm kernel oil

  3. Olive Oil (OO)—25

  4. Fish Oil (FO)—15%

Why are these ingredients beneficial?

  1. SO is high in polyunsaturated fatty acids like omega-3s and omega-6s. It's a high source of linoleic acid and α-linolenic acid, as well as bioactive EPA and DHA. During the 3rd trimester of pregnancy is when most of DHA is accumulated, meaning that premature infants are born with a DHA deficit. SO also serves as an excellent anti-inflammatory agent.

  2. MCTs do not accumulate in the liver or adipose tissue and are eliminated quickly from the bloodstream. In addition, they do not impair hepatic function. 

  3. OO is high in monounsaturated fatty acids. It is more resistant to oxidative stress from free radicals and is a great source of vitamin E, which is important to prevent cell damage by lipid peroxidation.

  4. FO is rich in α-tocopherol, which helps to prevent the oxidation of fatty acids.

What are the advantages of SMOFlipids?

Rapid clearance from the body

Reduction of the risk of cholestasis

Reduced oxidative stress

Reducesd direct bilirubin

Decreased liver damage

Reduced lipid peroxidation

Provision of essential long-chain polyunsaturated fatty acids (PUFAs) → These are critical in neonatal neurodevelopment and vision!

Increased immune system

Reduced inflammation

May prevent bronchopulmonary dysplasia (BPD)


Administration Instructions

SMOFlipid can be used for central lines or peripheral IVs, depending on the osmolarity of the solution. A higher concentration requires central access. It is important to use a 1.2 micron in-line filter in order to prevent air embolism. Also, a dedicated line for PN must be used, as PN is incompatible with SMOFlipid. The two fluids can and should be infused concurrently into the same vein via a Y-connector located near the infusion site.

NICU nurses, anything that I’m forgetting from the list? Does your NICU use SMOFlipid, too?

1 Comment
Screen Shot 2020-05-24 at 2.21.14 PM.png

Total Parenteral Nutrition

June 3, 2020

When a baby is born prematurely or is very sick in the NICU, oftentimes he or she is too young and/or fragile to be fed breastmilk or formula. During this time, your baby will receive infused nutrition through an IV in his or her vein called Total Parenteral Nutrition (TPN).

WHAT ARE THE COMPONENTS OF TPN?

TPN is composed of Parenteral Nutrition (PN) and Lipids. PN is the bright green bag hanging on your baby’s IV pole. It contains carbohydrates and sugar (dextrose), protein (amino acids), electrolytes, essential vitamins, as well as minerals. It’s basically “baby Gatorade.” The ingredients are customized DAILY depending on your baby’s blood work to help balance labs, meet fluid needs, and optimize growth.

The other very important constituent of TPN is Lipids. This is used in conjunction with PN as the source of calories (energy) and essential fatty acids (fats). This is the smaller, creamy white fluid that you see running through your baby’s IV. Lipids are a very concentrated form of fat that is safe for infusion through the vein. Lipids help your baby to gain weight and also help with brain growth and development.

Fun Fact: There are many different forms and types of Lipids. Stay tuned for a future post that describes the most common type used in the NICU!

Comment
Screen Shot 2020-05-29 at 10.31.37 PM.png

Hand Hygiene

June 1, 2020

WHAT IS HAND HYGIENE?

Hand hygiene is defined as hand washing or using an alcohol-based hand sanitizer.

WHY IS HAND HYGIENE IMPORTANT?

One of the best ways that you can help to keep your baby safe from infection is by washing your hands. The immune system—which works to fight diseases caused by germs (from viruses & bacteria)—does not work well in babies compared to older children and adults. As a result, babies (especially preemies) can get very sick. This is because they have very underdeveloped immune systems and have a harder time fighting germs.

While hand washing is always the best way to prevent the spread of disease, it is even more important during cold and flu season (October-May). Most viruses are spread by direct contact and can cause serious illness in NICU babies.

WHEN SHOULD I WASH MY HANDS?

Wash your hands with soap and water:

  1. If they are visibly soiled (e.g. if you can see dirt)

  2. After touching your baby’s bodily fluids (saliva, vomit, etc.)

  3. After changing your baby’s diaper

  4. After using the restroom

  5. After touching hospital surfaces (door knobs, bedside tables, isolettes, etc.)

  6. Before and after pumping

  7. BEFORE you touch your baby!

HOW DO I CLEAN MY HANDS?

It is SO important that all parents, family members, visitors, staff—EVERYONE who comes in contact with your baby washes their hands correctly by following these steps:

  1. Roll your sleeves up past your elbows. They will remain above your elbows during your entire visit & will not be rolled down until you leave the NICU.

  2. Remove all watches, rings, and jewelry. These items contain germs, dirt, and bacteria that cannot be killed with soap and water. They pose a major threat of potentially getting your baby sick.

  3. Wet your hands and forearms with warm water.

  4. Apply a generous amount of soap on your hands.

  5. Rub your hands together until the soap forms a lather, and then rub it all over your hands and up to your elbows.

  6. Scrub in between your fingers, under your nails, and all the way around your hands and forearms for at least one full minute.

  7. Rinse your hands well under running water.

  8. Dry using a paper towel.

Remember to use an alcohol-based hand sanitizer intermittently throughout the day and rewash whenever necessary!

Comment
Screen Shot 2020-06-01 at 3.07.50 PM.png

Oral Thrush

June 1, 2020

What is Oral Thrush?

Both common and not usually serious, oral thrush is a type of yeast infection that typically appears in the form of white patches that coat your baby's gums and tongue along with the sides and roof of the mouth. It is characterized by white plaques on the oral mucosa similar to sour milk.

What Causes Thrush?

Thrush is caused by a yeast called Candida albicans. This is the most common and frequent fungal infection in preterm infants, affecting 2-20% of all preemies. Premature infants have very immature and underdeveloped immune systems, meaning that they are very susceptible to acquiring infections. While it's just a mild infection, thrush can be quite uncomfortable and very painful for your baby.

How Do Babies Acquire Thrush?

Oftentimes, it starts in mom’s birth canal as a yeast infection, and that's where baby picks it up as he makes his way into the world. Candida albicans is an organism that normally hangs out in the mouth or vagina and is typically dormant and kept in check by other microorganisms. However, if mom gets sick, starts using antibiotics, or experiences hormonal changes (such as in pregnancy), this balance gets disrupted, allowing Candida albicans to grow and cause the infection.

Since thrush is usually picked up at birth, it most commonly manifests in newborns. Older babies can also develop thrush if they've been taking antibiotics to fight an infection (which kills both "good" and “bad” bacteria) or have a depressed/weakened immune system. Thrush can also be acquired from mom’s breasts while nursing or from dirty bottles and/or pacifiers. It is important to regularly disinfect, sterilize, and replace anything that is put in your baby's mouth on a regular basis, since these items are the perfect environment for yeast to thrive.

What Does Oral Thrush Look Like?

Although white patches can be a sign of thrush, they can also just simply be milk residue that remained on the baby’s tongue after feeding. In order to determine if the white you’re seeing is just leftover milk or actually a fungal infection, try to wipe it off gently by using a soft, damp cloth, the edge of a tongue depressor, or a gauze-covered finger. If the white is able to be scraped off and the tongue is pink and healthy-looking after wiping, no further treatment is necessary. If the white patch doesn't come off, or it does and you find a raw, red patch underneath, this is likely thrush, and you should contact your pediatrician.

What are Some Other Signs of Oral Thrush?

Fussiness during feeding can be another indication of oral thrush. If your infant is sucking on a pacifier or nipple, then cries or turns away in pain, he or she likely has a fungal infection. Your baby may not want to bottle feed, as the pain and irritation can deter him from enjoying this experience. If left untreated, this can cause your baby to associate bottle feeding with pain and discomfort—ultimately leading to nipple aversion. 

How is Oral Thrush Treated?

Although oral thrush is not serious or life threatening, it is highly contagious and acquired very easily, which means that prompt treatment is necessary. The physician may prescribe an antifungal medication (such as Nystatin), which is applied topically inside the mouth and on the tongue multiple times a day for a minimum of 10 days. The best technique is to dip the baby’s pacifier or your gloved-finger in the solution and then place it in your baby’s mouth for him to suckle on. It is important to apply the medication to ALL of the white patches in your baby's mouth. In addition to oral meds, disposing of and sanitizing all bottles and nipples is ESSENTIAL in order to eliminate external contamination. The goal is to minimize any residue that might be used as a culture medium for Candida albicans growth and to prevent the colonization of this microorganism.

ATTENTION MOMS

If you have nipple thrush, your doctor will likely recommend that you apply a prescription antifungal cream to your breasts as well. With the proper remedy, the infection should take a week or so to clear up; check in with your doctor if it doesn't.

Comment
Screen Shot 2020-06-01 at 11.46.21 AM.png

It's Okay To Not Be Okay

June 1, 2020

You are tired. You are fatigued (physically, mentally, and emotionally). Your face literally hurts from the constant use of masks and shields. You’ve lost track of the days (whether you’re inside the hospital or inside your own home). There are days where you sit and cry, wondering why you ever became a nurse in the first place. Your suffering is so overwhelming and oftentimes unbearable. 

I know it seems like the worst is already here, yet all we hear is that the worst is yet to come. I know you are TRYING your absolute hardest...for us, for you, and for your patients. I am so forever grateful for the selfless and brave frontliners who serve on the forefront every day and take care of the SICKEST of the sick COVID-19 patients. 

It’s a nerve-racking time to be a nurse right now. I know I’m probably safest in the NICU where we are already so on top of hygiene and sanitizing and keeping the unit as clean as possible. However, that doesn’t mean I don’t fear walking through the hospital everyday to get to my unit and taking that risk of potentially exposing myself to COVID-19 and ultimately passing that on to my family and NICU babies. 

With time, I know the feeling will subside. And sometimes it’s okay to not be okay! I know that I’ve been distant with my ‘gram lately, so I appreciate those who stuck it out with me while I get through these crazy times at work!

Anybody else have similar thoughts? How are you feeling right now? Let’s chat!

Comment
Screen Shot 2020-05-29 at 10.27.43 PM.png

Scrubbing In

May 29, 2020

Handwashing is essential to protect your baby from getting sick. Keeping your hands clean (hand hygiene) is the most important way to stop the spread of germs. Hand hygiene includes washing your hands with soap and water and using hand sanitizer gel intermittently. All parents and visitors must wash their hands when they enter the NICU. One of the jobs of a NICU nurse is to instruct, educate, and remind staff and families to clean their hands before they touch their baby. 

Each time parents and staff enter the NICU, they follow the same routine:

  • Remove all jewelry such as rings, watches, bracelets, etc. 

  • Push your sleeves above your elbows. Sleeves must remain above the elbow for the duration of your visit.

  • Wash your arms and hands, from elbow to fingertips, with soap and water for ONE FULL MINUTE.

  • Use a timer or watch the clock in order to properly time yourself.

  • Remember to scrub under your fingernails and everywhere that’s visibly soiled

  • If you leave the hospital or unit and pull down your sleeves, you will need to repeat the scrubbing in process again.

  • All parents, siblings, and guests who enter the NICU must follow hand hygiene guidelines even if they don’t plan on touching the infant during their visit.

  • It’s a good idea to wipe down surfaces that you plan on touching in order to reduce the spread of germs (i.e. cell phones, cameras, water bottles, etc.)

Use hand-sanitizer:

  • Before and after touching your baby, including after changing your baby’s diaper. HOWEVER, if your hands get visibly soiled with pee or poop, clean them with soap and water.

  • After touching any electronic devices or personal items

  • If you step out of your baby’s room for any reason.

Other ways that you can protect your baby from infection:

  • Do not visit your baby if you are sick. Also, ask friends and family not to visit the NICU either if they are sick. ESPECIALLY SIBLINGS! Leave them at home!

  • If you simply cannot take off your jewelry for any reason whatsoever (religion, sizing issue), don gloves over your hands to protect your baby from potential pathogens. 

  • During sterile procedures in your baby’s room, you may be asked to wear a mask or even step outside momentarily to prevent the possible spread of infection.

Screen Shot 2020-05-29 at 10.31.16 PM.png
Comment
Screen Shot 2020-05-24 at 3.50.35 PM.png

Attention High School Seniors!

May 24, 2020

The most common question that I receive almost everyday is as follows: “I am a high school senior, and my dream is to become a NICU nurse. Can you tell me what steps I need to take in order to get into nursing school and become a NICU nurse?”

There are SO many different pathways that you can choose in order to become a NICU nurse, which can be very overwhelming, intimidating, and frankly—scary! My path was definitely not the “traditional” route by any stretch of the imagination.

If you are NOT a high school senior but rather a pre-nursing student struggling to get accepted into nursing school, CLICK HERE for some awesome tips!

For all the high school seniors out there interested in becoming NICU nurses, here is a helpful guide that you can use for reference as a general roadmap!

During your senior year of high school, you will work with your academic advisor/counselor and apply to college as a PRE-NURSING major. You will also need to take a college placement test such as the ACT or SAT when you first apply, depending on what your college of choice wants. During your undergraduate studies where you get accepted into college—hopefully it was your #1 choice—you will spend roughly two years completing the prerequisite courses that you need to get accepted into nursing school. These courses are called “pre-nursing classes” and usually consist of subjects such as Chemistry, Biology, Anatomy & Physiology, Microbiology, Statistics, Oral Communication, etc. Every college requires different courses, though, so be sure to check with them first!

Typically, these classes can be taken in any order and you can take as many as you want at the same time. Personally, however, I recommend taking only a couple at a time so that you can really focus and do well. This curriculum can be taken at a 2-year university such as a community/junior college OR a 4-year university. A city college is typically much cheaper and less impacted, meaning you can take all of the prerequisite courses in a shorter amount of time without having to put your name on any waiting lists. Sometimes, the classes are slightly easier at a community college, too!

These pre-nursing classes are what you need to take in order to get into NURSING SCHOOL, and it is during nursing school when you are considered to be a NURSING STUDENT. You cannot start a nursing program directly after high school, which is a common misconception. Sometimes, the college where you complete your pre-nursing classes may not necessarily be the college where you get accepted into nursing school. This is because nursing school requires another separate application process after you’ve finished all of your pre-requisite courses. You cannot just automatically transition from pre-nursing to nursing. it is much more complicated than that. You will also be required to take another standardized test such as the TEAS test, which is specific for nursing school entry.

The grades that you receive in your prerequisite courses determines how strong of a candidate you will be and how likely it is that a nursing school is going to pick you for their program. The better you do in your pre-nursing courses, the better chance you have of being accepted. It is a VERY difficult and competitive process in order to get into nursing school. However, anything is possible with self-determination, hard work, and motivation!

1 Comment
← Newer Posts Older Posts →

Latest Posts

Featured
Sep 24, 2020
Handoff Report
Sep 24, 2020
Sep 24, 2020
Sep 3, 2020
Common NICU Diagnoses
Sep 3, 2020
Sep 3, 2020
Sep 3, 2020
Let's Talk: PFO
Sep 3, 2020
Sep 3, 2020
Sep 3, 2020
Essentials to Know
Sep 3, 2020
Sep 3, 2020
Sep 3, 2020
Sample 1:1 Assignment
Sep 3, 2020
Sep 3, 2020
Sep 3, 2020
NICU Parents
Sep 3, 2020
Sep 3, 2020
Aug 11, 2020
Typical Day in the Life of a NICU Nurse
Aug 11, 2020
Aug 11, 2020
Aug 9, 2020
Hypoplastic Left Heart Syndrome (HLHS)
Aug 9, 2020
Aug 9, 2020
Aug 9, 2020
Let's Talk: PDA
Aug 9, 2020
Aug 9, 2020
Aug 5, 2020
Is Being a New Grad in the NICU Hard?
Aug 5, 2020
Aug 5, 2020
Aug 5, 2020
Will I Lose My Skills?
Aug 5, 2020
Aug 5, 2020
Jul 30, 2020
My Personal Journey
Jul 30, 2020
Jul 30, 2020
Jul 30, 2020
Surgeries
Jul 30, 2020
Jul 30, 2020
Jul 30, 2020
NCLEX Updates
Jul 30, 2020
Jul 30, 2020
Jul 27, 2020
Airborne Precautions
Jul 27, 2020
Jul 27, 2020
Jul 27, 2020
Contact Precautions
Jul 27, 2020
Jul 27, 2020
Jul 27, 2020
Droplet Precautions
Jul 27, 2020
Jul 27, 2020
Jul 20, 2020
Feeding a Preemie
Jul 20, 2020
Jul 20, 2020
Jul 20, 2020
Why Does Flow Matter?
Jul 20, 2020
Jul 20, 2020
Jul 14, 2020
Face Shield Calligraphy
Jul 14, 2020
Jul 14, 2020
Jul 12, 2020
Helpful Tips to Combat Maskne
Jul 12, 2020
Jul 12, 2020
Jul 7, 2020
Let's Talk: Ostomies
Jul 7, 2020
Jul 7, 2020
Jul 6, 2020
Baby Steps to Home
Jul 6, 2020
Jul 6, 2020
Jun 28, 2020
Tracheostomies
Jun 28, 2020
Jun 28, 2020
Jun 16, 2020
I Got My Antibodies Tested (again)
Jun 16, 2020
Jun 16, 2020
Jun 14, 2020
Chest Tubes
Jun 14, 2020
Jun 14, 2020
Jun 11, 2020
Mastering IV Skills in the NICU
Jun 11, 2020
Jun 11, 2020
Jun 10, 2020
Caput Succedaneum
Jun 10, 2020
Jun 10, 2020
Jun 10, 2020
Congenital Syphilis
Jun 10, 2020
Jun 10, 2020
Jun 9, 2020
Preemie Preparation
Jun 9, 2020
Jun 9, 2020

Powered by Squarespace